
This post is a little different than my standard fare here at The Golden Seven, but it's something that I'm excited about sharing with you, so I hope you'll bear with me. A couple of years ago I went to an Enrichment meeting where people shared their ideas for inexpensive handmade Christmas gifts. I don't remember much else that was discussed that night, except for this idea from my friend, Becca Tippets. She had had a relative serve a mission in Finland who had brought them home a nativity set. She looked at it one day and decided that she wanted to try to recreate it herself. Armed only with the idea of her own nativity she went to the craft store and figured out how to do it from scratch. Although I'm not sure I ever would have thought to make my own in the first place, Becca's creativity proved to be as amazing as everything else about her and her version not only turned out beautifully, but she had also typed up detailed instructions of how to make it and shared it with the rest of us. That Christmas season, my sister and I (mostly my sister) made several handmade Finnish nativity sets for gifts for family members.
This year I decided to make one more set and take more detailed pictures along the way, so that I could create this step-by-step tutorial and share it here with you. The directions are still mostly Becca's with some slight modifications and tricks added that we learned along the way.
Keep in mind, that this can be as simple or as complex as you want it to be. We made the full version, but you could make only the Joseph, Mary, and baby Jesus for a very simple and inexpensive version. Or leave out one or more of the animals. We used a wooden clementine box as the stable, which didn't add any cost at all, but you could also use fabric draped over stacks of books! Enjoy!

Directions by Becca Tippets
Pictures and adaptations by Lara Goold
SHOPPING LIST (shop in the wood aisle of a craft store)
TOOLS NEEDED:
1. drill
2. 7/32 drill bit
3. hack saw
4. wood glue
5. hot glue gun
6. wire clippers
7. sander and sand paper
DIRECTIONS:


See pictures for Joseph for steps 1-5 (omitting drilling the second hole for a hand)


*SHOPPING NOTES:
I shopped in the wood aisles at Michael's and AC Moore craft stores. Almost all of the items were "Lara" brand (cool name, but nothing to do with me). The selection and prices between the two stores was similar, but there were a few items that were at one store and not the other, so I do recommend trying two craft stores if they are available. You can also try looking online. We easily found everything on the list two years ago when we made these the first time, but this year (2012) we had trouble finding a couple of items. I adjusted the directions accordingly and listed substitute suggestions (some of which we used), but please note that in future years (or at your craft stores) that you may need to find substitute items for things that are unavailable. Use the pictures as a basis for your creativity.
GLUING NOTES:
Use wood glue for everything internal (in a hole) and hot glue for everything external (gluing on hats, halos, gifts, etc)
PAINTING NOTES:
After painting several different versions, I decided I liked it better when the wood grain would show through the paint slightly. I usually used one coat of acrylic paint and/or sanded it lightly to give it a bit of a distressed look.
A CLOSER LOOK:
Here is a closer look at some of the items we used, so that you can see what they look like:
This year I decided to make one more set and take more detailed pictures along the way, so that I could create this step-by-step tutorial and share it here with you. The directions are still mostly Becca's with some slight modifications and tricks added that we learned along the way.
Keep in mind, that this can be as simple or as complex as you want it to be. We made the full version, but you could make only the Joseph, Mary, and baby Jesus for a very simple and inexpensive version. Or leave out one or more of the animals. We used a wooden clementine box as the stable, which didn't add any cost at all, but you could also use fabric draped over stacks of books! Enjoy!

Click here for PRINTABLE VERSION ( the text with only the basic pictures).
Directions by Becca Tippets
Pictures and adaptations by Lara Goold
SHOPPING LIST (shop in the wood aisle of a craft store)
Materials Needed
|
Which figure it belongs to
|
Amount (type of packaging)
|
cost
|
Small wooden goose eggs (about 3-inches tall)
|
Bodies of people and animals
|
10
|
2.29 per egg (x10)
|
1 ¼ inch doll heads
|
Heads of people, angel
|
7 (come in value packs of 9)
|
3.99 per bag
|
5/8 inch round wooden beads
|
Hands of Joseph, shepherd, and 1
wiseman; feet of angel
|
5 (come in value packs of 7)
|
1.69 per bag
|
3/8 in round wooden beads
|
Head piece for angel and Mary and tops
of crown for wisemen, ears for one animal
|
25 (come in value packs of 71)
|
3.49 per bag
|
2 inch doll head
|
Body of angel
|
1
|
1.99 per head
|
Pullet eggs
|
Heads of animals
|
3 (come in pack of 3)
|
1.19 per pack
|
Robin egg half (or a very small oval paper mache box)
|
Manger
|
1 (comes in pack of 2)
|
1.19 per pack
|
Assorted wooden bowls or
1-inch wooden wheels |
Crown piece for wisemen
|
3 biggest (come in pack of 9)
|
1.19 per pack
|
Acorn dowel cap (1-1/8-inch)
|
Present for wiseman
|
1 (come in pack of 2)
|
1.29 per pack
|
Boy game piece
|
Jesus
|
1 (comes in pack of 3)
|
1.29 per pack
|
¾ inch block
|
Present for wiseman
|
1 (comes in pack of 6)
|
1.29 per pack
|
Wooden ring (in the jewelry section)
or a dark wooden letter “O” 1-1/2 inches
|
Hat for Joseph and shepherd
|
2 big rings (comes in assorted pack in
jewelry)
|
3.99 per pack
|
Shell rings (in jewelry section) or
light colored letter “O”
|
Horns for sheep
|
2 broken in half (comes in pack of 5
in jewelry)
|
3.99 per pack
|
.47 cm or 3/16-inch wooden dowel
|
Attach heads and arms to body
|
1
|
.29
|
3 pieces of floral wire 6-7 inches
long
|
Staff for Joseph, Shepherd, and 1
wiseman
|
1.99
|
|
Yellow, purple, red, blue, white,
brown, green paint
|
To color bodies
|
.69 each color
|
|
Clear finish spray paint
(optional) |
I used flat, but I think gloss would
look better
|
wooden clementine box (for stable)
Total cost: $56.77 (not including tools needed)
Total cost: $56.77 (not including tools needed)
TOOLS NEEDED:
1. drill
2. 7/32 drill bit
3. hack saw
4. wood glue
5. hot glue gun
6. wire clippers
7. sander and sand paper
DIRECTIONS:
Joseph (green)
|
|
1. Using 7/32 drill bit
a.
Drill hole in
top of goose egg (to place head)
b.
Drill hole 1.5
inches down on the side (for arm)
c. Widen the hole (with the drill) in 1
¼ inch doll head
d.
Drill hole in
5/8 inch bead perpendicular to preexisting holes
2. Paint whole egg (green)
3. Cut 2
pieces of dowel about 1-inch long
4. Put a dab of wood glue in all the holes
5. Assemble head and body using dowel to connect the
two
6. Put the hand on using a dowel
7. Cut a piece of wire and bend into candy cane shape to
make a staff, put through hand hole
8. Hot glue wooden donut ring (or dark colored wooden "O") to Joseph’s head
|
 |
Mary (light blue)
|
|
1. Using 7/32 drill bit
a.
Drill hole in
top of goose egg (to place head)
b. Widen the hole (with the drill) in 1
¼ inch doll head
2. Paint egg (light blue)
3. Cut 1
piece of dowel about 1-inch long
4. Put a dab of wood glue in all the holes
5. Assemble head and body using dowel to connect the
two
6. String 10 of the 3/8 round beads into crown shape
and glue onto head using hot glue
|
 |
See pictures for Joseph for steps 1-5 (omitting drilling the second hole for a hand)
Wisemen (red, purple, yellow)
|
|
1. Using Saw
a.
Cut bottom .5
inches off of each egg (3 times)
2. Using 7/32 drill bit
a.
Drill hole .5
inches down from top of goose
egg (3 times) (to place the bowed heads)
b.
Drill hole
1.5-2 inches down on the side of one goose egg (for a hand)
c. Widen the hole (with the drill) in 1
¼ inch doll head
d.
Drill hole in
5/8 inch bead perpendicular to preexisting holes
3. Paint each wiseman a different color (red, purple, yellow)
4. Assemble each body and head with a 1- inch dowel
5. Assemble hand on one body
6. Glue acorn cap on belly of handless wiseman using
hot glue (as a gift)
7. Glue cube on body of belly of other handless wiseman
using hot glue (as another gift) or drill a hole in body and cube and attach with wooden dowel
|
 |
Angel (white)
|
|
1. Using 7/32 drill bit
a.
Drill hole in
round top of 2 inch doll head (to place head)
b. Widen the hole (with the drill) in 1
¼ inch doll head
3. Paint large doll head and the two 5/8 inch beads white
4. Using wood glue and a 1-inch piece of the dowel assemble
head and body
5. Cut (two) 2.5 inch strings and thread them through the 5/8
inch beads, then glue them to the bottom back side of the body so that the legs swing
down.
6. Paint 10 of the 3/8 beads white
7. Thread the 10 beads together and hot glue onto
angel’s head (for halo)
|
 |
I did not take any more pictures of the angel process, but suffice it to say it is similar to the rest of them, except for gluing the legs onto the bottom.
Shepherd (brown)
|
|
1. Using 7/32 drill bit
a.
Drill hole in
top of goose egg (to place head)
b.
Drill hole 1.5
inches down on the side (for arm)
c. Widen the hole (with the drill) in 1
¼ inch doll head
d.
Drill hole in
5/8 inch bead perpendicular to preexisting holes
2. Paint whole egg (brown)
3. Cut 2
pieces of dowel about 1 inch long
4. Put a dab of wood glue in all the holes
5. Assemble head and body using dowel to connect the
two
6. Put the hand on using a dowel
7. Cut a piece of wire and bend into candycane shape to
make a staff, put through hand hole
8. Glue small piece of material (about 3-1/2 x 2-1/4-inch) to Shepherd’s head
9. Glue wooden donut ring (or dark colored wooden "O") on top of material on
shepherd’s head
|
 |
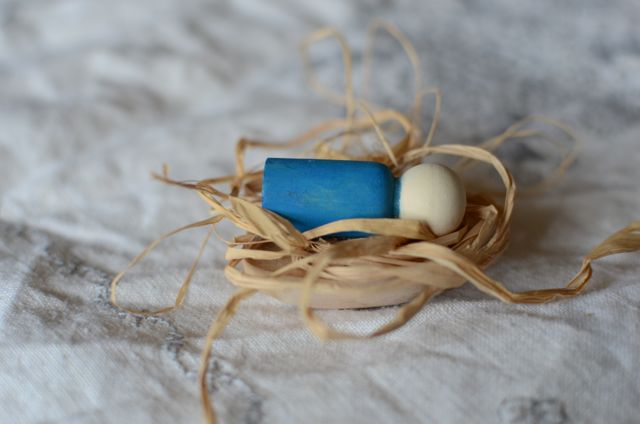
Jesus (dark blue)
|
|
1.
Sand bottom of
Robin’s egg so it lays flat on table
2.
Hot glue gun
raffia on for straw
3.
Paint cylinder
part of boy game piece (leave head plain) --dark blue
4.
Hot glue gun
boy game piece on top of straw
|
 |
Animals (sheep--white, cow--brown)
|
|
1. Sand long side of egg so that when egg is lying down it
can be stable, not rolling (3 times) (we found this MUCH easier to do with an electric sander)
2. Using 7/32 drill bit
a.
drill hole a
little to the top of the egg center (3 times) (for the heads)
b.
drill hole in
pullet egg towards the wide end of the egg on the side (3 times) (to connect the head)
3. paint two animals white (heads and body)
4. paint one animal brownish yellow (head and body)
5. assemble heads and body using 1-inch pieces of dowel
and wood glue
6. break shell donut rings into thirds and use two
pieces for horns (you’ll need 4 pieces altogether) on the white sheep hot gluing them into place
7. use two of the 3/16 beads for the ears of the
brownish animal (paint them the same color as the animal)
|
 |
*SHOPPING NOTES:
I shopped in the wood aisles at Michael's and AC Moore craft stores. Almost all of the items were "Lara" brand (cool name, but nothing to do with me). The selection and prices between the two stores was similar, but there were a few items that were at one store and not the other, so I do recommend trying two craft stores if they are available. You can also try looking online. We easily found everything on the list two years ago when we made these the first time, but this year (2012) we had trouble finding a couple of items. I adjusted the directions accordingly and listed substitute suggestions (some of which we used), but please note that in future years (or at your craft stores) that you may need to find substitute items for things that are unavailable. Use the pictures as a basis for your creativity.
GLUING NOTES:
Use wood glue for everything internal (in a hole) and hot glue for everything external (gluing on hats, halos, gifts, etc)
PAINTING NOTES:
After painting several different versions, I decided I liked it better when the wood grain would show through the paint slightly. I usually used one coat of acrylic paint and/or sanded it lightly to give it a bit of a distressed look.
A CLOSER LOOK:
Here is a closer look at some of the items we used, so that you can see what they look like:
 |
| wooden goose eggs for most of the bodies (need 10) |
 |
| 1-1/4-inch doll heads for most of the figures' heads |
 |
| 1-1/8-inch acorn dowel cap (for wise man's gift) |
 |
| 2-inch doll head for body of angel |
 |
| wooden wheel (on left) vs wooden bowl (not available this year) for wise man's hats figures in this post are shown with the wooden wheel as the hat |
 |
| boy game pieces for baby Jesus |
 |
| 3/4-inch square block for wise man gift |
 |
| for the sheep's horns (or use a light colored wooden "O") |
 |
| for Joseph's and shepherd's head piece this was one that we had a hard time finding this time around and couldn't find a substitute item we liked as well. The "O" was okay, but did not fit on the heads as nicely. If you can't find them at the store, try finding them at Amazon |
2 comments:
This is a really sweet nativity!
I loved your spiritual notings .Great to read .Thanks .
Post a Comment